Wood Ski Waxing
Glide
Using a cold kick wax (Special Green or Polar), apply
a thin layer to the base for the whole length of the ski. Using a
cork, rub the base until
the friction blends and smoothes the wax in. Repeat the wax application
until the base has a shiny, glass-like surface. You may have to apply
the cold kick wax two or three times.
Kick
Hard Wax: Crayon a light layer of the wax of
the day over the base glide wax. Using a cork, rub the wax briskly
until it gets smooth and blends into the base. Repeat the application
of wax and corking 2 or 3 times. The wax of the day can be chosen
by looking at a chart provided by the wax manufacturer. Kick wax is
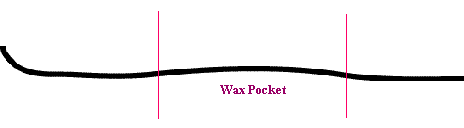
typically only applied below the foot on the base of the ski from
the heel to about 10" past the toe of the boot.
Klister: Apply the klister to the kick zone using
short, chevron style streaks of wax. Smooth into the base with your
thumb or a Klister spreader. If necessary, you can warm the klister
on the base with a propane torch or a hot air gun. But be careful!
Apply klister in a thin layer! Multiple layers may be necessary for
icy conditions.
